

Did you know that over 56% of dog owners struggle with pets that pull on the leash during walks? A no pull harness can make every stroll safer and easier, but only if it fits your dog just right. The difference between a secure, comfortable walk and a stressful tug-of-war often comes down to how well you measure, adjust, and fit the harness. Small steps and careful checks can help your pup enjoy every adventure by your side.
Quick Summary
| Key Point | Explanation |
|---|---|
| 1. Measure Properly for Size | Use a soft measuring tape to measure chest girth accurately, ensuring a snug fit that allows for movement. |
| 2. Adjust Straps with Care | Utilize the two-finger test for strap adjustments to ensure a secure yet comfortable fit without restricting natural movement. |
| 3. Position Harness Correctly | Start by loosening the straps, then position the harness by sliding it over your dog’s head and adjusting for proper alignment. |
| 4. Choose the Right Leash Ring | Attach the leash to the front ring for no-pull training or the back ring for casual walks, based on your dog’s behavior. |
| 5. Conduct a Comfort Test Walk | Take a short, low-distraction walk to check for any signs of discomfort or chafing, making necessary adjustments as you go. |
Table of Contents
- Step 1: Select The Right No Pull Harness Size
- Step 2: Adjust Straps For A Secure, Comfortable Fit
- Step 3: Position The Harness On Your Dog Correctly
- Step 4: Attach The Leash To The Appropriate Ring
- Step 5: Test The Harness During A Short Walk
- Step 6: Check For Proper Fit And Make Final Adjustments
Step 1: Select the right no pull harness size
Picking the perfect no pull harness starts with one critical task getting the right size for your dog. This isn’t just about grabbing something that looks cute it’s about finding a harness that fits comfortably and keeps your pup secure during walks.
To nail the right size, you’ll want to grab a soft measuring tape and focus on two key measurements. According to EzyDog, you should measure your dog’s chest girth at the widest part just behind their front legs. This spot matters more than your dog’s weight or breed when selecting a harness.
Start by having your dog stand normally. Wrap the measuring tape around their chest right behind those front legs make sure the tape is snug but not tight. You want about two fingers of space between the tape and your dog’s body this ensures room for movement without being loose. Pro tip if your furry friend is between sizes always size up. Adjustable straps will help you get that perfect custom fit.
Quick Tip: Avoid measuring over thick fur. For long-haired dogs pull the fur aside to get an accurate measurement.
Once you’ve got those measurements, check the manufacturer’s sizing chart. Most brands provide detailed guidelines matching chest circumference to specific harness sizes. Remember that a well-fitted harness should distribute pressure evenly and prevent uncomfortable chafing during your walks.
Ready to move forward? Next up we’ll talk about how to actually put the harness on and make those final adjustments for maximum comfort and control.
Step 2: Adjust straps for a secure, comfortable fit
Now that you’ve selected the right harness size it’s time to make sure those straps fit perfectly. A well-adjusted harness is like a good pair of running shoes comfortable secure and allowing total freedom of movement.
According to Gaugau Pet, the golden rule is the two-finger test. After putting the harness on your dog you should be able to comfortably slide two fingers underneath each strap. This ensures the harness is snug without being restrictive. Start with the chest strap first making sure it sits centered and doesn’t interfere with your dog’s shoulder movement.
Next tackle the neck and belly straps. Dogistry recommends checking that these straps lie flat against your dog’s body without any twisting. Walk your dog around for a few minutes to see how the harness moves. Does it shift? Does your pup look uncomfortable? These are signs you might need to readjust.
Pro Tip: Always do a mobility check. Your dog should be able to walk run and sit comfortably without the harness restricting their natural movements.
Pay special attention to areas prone to chafing like armpits and neck. If you see any redness or notice your dog seems uncomfortable make small adjustments.
 Sometimes just loosening a strap by a finger’s width can make all the difference.
Ready to hit the trail? Let’s talk about how to actually put this perfectly fitted harness on your dog.
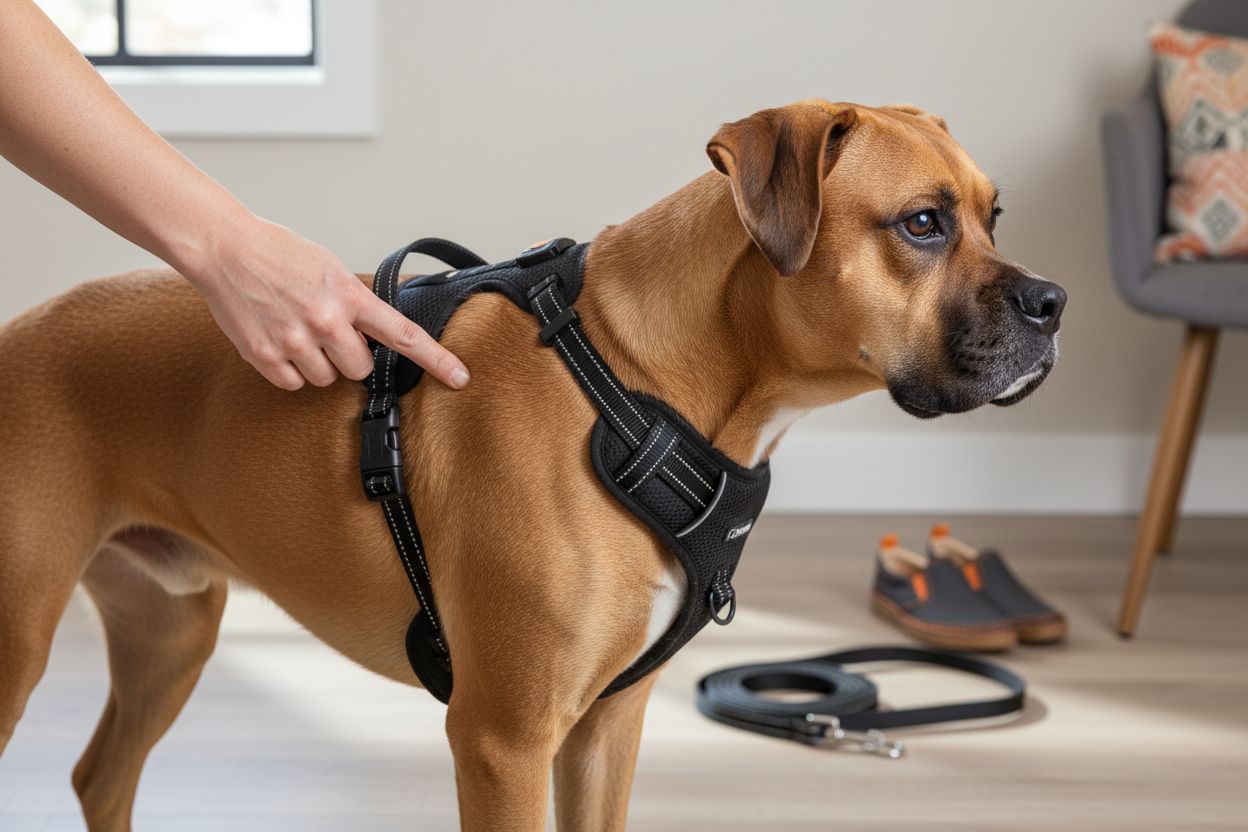
Step 3: Position the harness on your dog correctly
Time to get that no pull harness onto your furry friend. This step can feel a bit tricky at first but with a little practice youll become a pro at positioning the harness quickly and comfortably.
According to Furric, start by loosening all the straps completely. Look for the front of the harness which typically has the leash attachment ring. Slide the harness over your dogs head gently making sure not to startle them. The chest strap should sit right under their front legs.
As Rover Time recommends first adjust the under-rib strap loosely then tighten the back strap. Your goal is to have the chest strap sitting above your dogs shoulders without restricting movement.
Think of it like putting on a comfortable jacket your dog should barely notice its there.
Quick Tip: Keep some tasty treats nearby. Turning harness time into a positive experience with rewards makes future fittings much easier.
Pay attention to your dogs body language. If they seem uncomfortable or are trying to wiggle away take a moment to readjust. Not every dog loves wearing a harness right away so patience is key. Remember the two-finger rule make sure you can comfortably slide two fingers under each strap.
Ready to hit the road? Next well cover how to attach the leash and start your walking adventure.
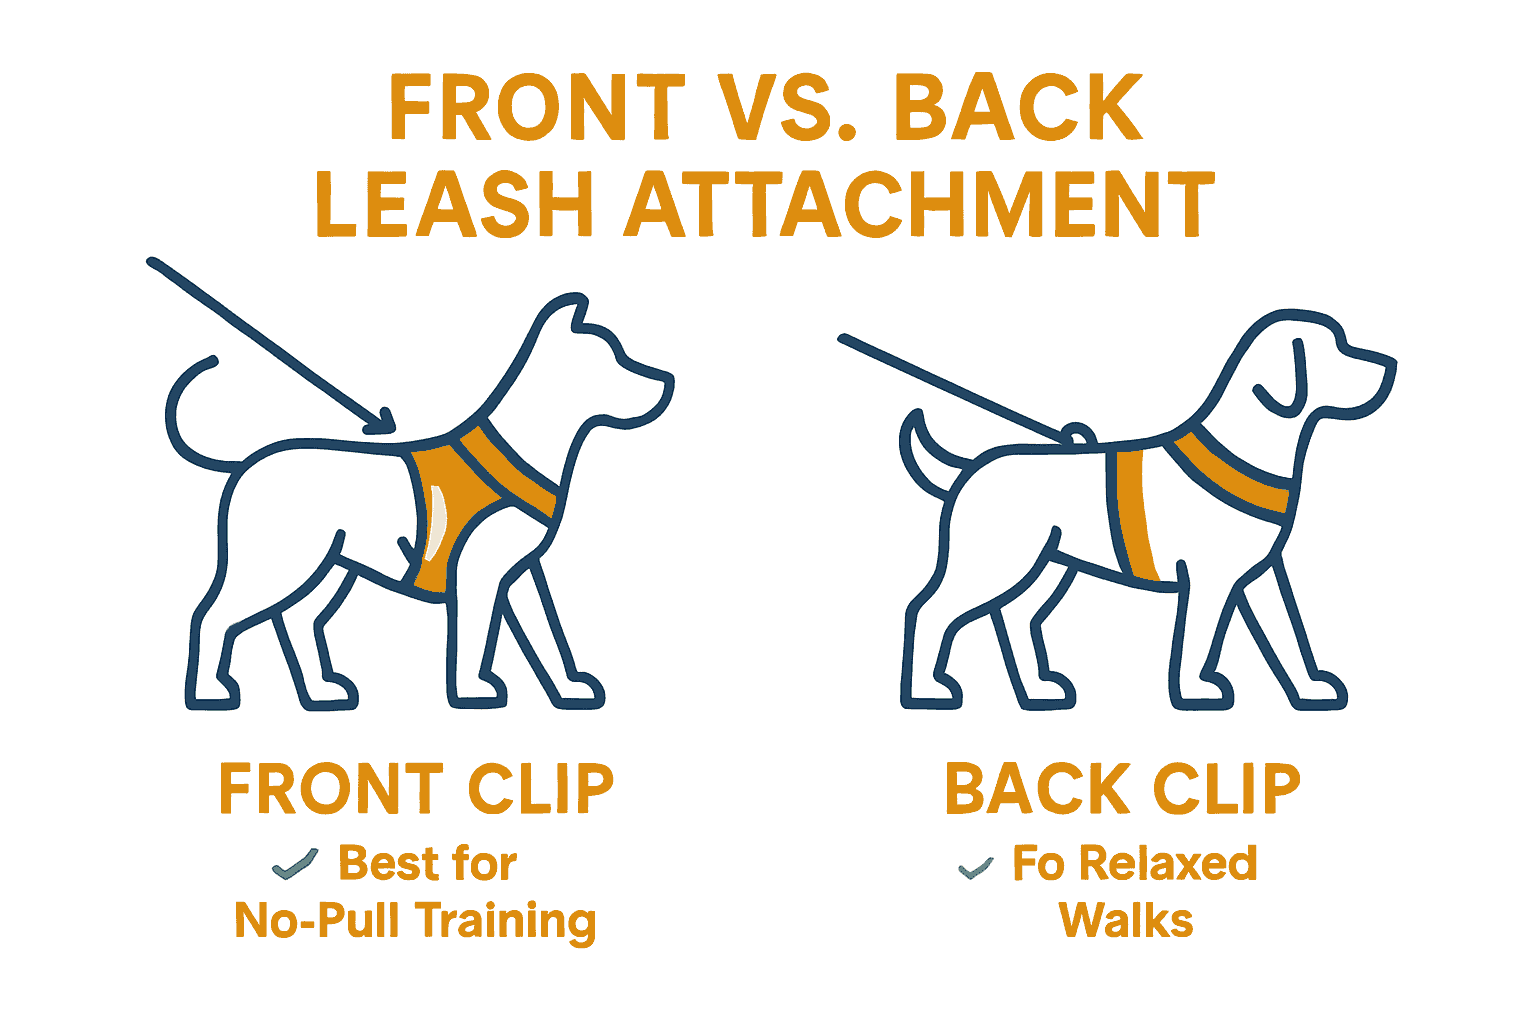
Step 4: Attach the leash to the appropriate ring
Not all leash attachment points are created equal and knowing which ring to use can dramatically improve your walking experience. Your no pull harness is designed with specific attachment points that serve different training and walking purposes.
According to PetSafe, you have two primary leash attachment options: the front and back rings. For no pull training walks youll want to focus on the front attachment point. This special front clip is a game changer for managing dogs that tend to pull.
The front clip works by redirecting your dog’s momentum when they pull. When your pup starts to surge forward the front attachment naturally shifts their body position making them turn slightly toward you. This subtle redirection discourages pulling behavior without causing discomfort.
Pro Tip: Start with short training walks using the front clip. As your dog learns better walking manners you can gradually transition to the back ring for more relaxed walks.
For casual walks or with dogs already trained not to pull the back attachment ring provides a more traditional walking experience. It allows more freedom of movement and feels more natural for dogs comfortable with loose leash walking.
Ready to start walking? Lets discuss some key techniques for maintaining control and making your walk enjoyable for both you and your furry friend.
Step 5: Test the harness during a short walk
You’ve measured fitted and attached the leash time to take your first official walk with the new no pull harness. This initial test drive helps you confirm everything fits perfectly and your dog feels comfortable.
According to Rover Time, start with a short walk in a low distraction environment like your backyard or a quiet street. Keep some treats handy to create positive associations with the harness. Watch how your dog moves and check if the harness stays balanced without shifting around.
Dogistry recommends paying close attention to your dogs body language and movement. Does the harness allow natural walking? Check for any signs of chafing or discomfort. Your dog should move freely without restriction.
Pro Tip: If your dog pulls dont yank back. Gently redirect their attention using the front clip and reward calm walking behavior.
During this test walk focus on creating a positive experience. Keep the walk short and enjoyable. If you notice any issues with fit or your dogs comfort take a moment to make small adjustments. Remember the goal is a comfortable secure walk that feels good for both of you.
Ready to become a pro at no pull harness walking? Next well cover some advanced techniques to make your walks smoother and more enjoyable.
Step 6: Check for proper fit and make final adjustments
Youve done most of the hard work now comes the crucial final check to ensure your no pull harness fits like a glove. Think of this as your quality control moment where youll fine tune everything for maximum comfort and effectiveness.
According to Gaugau Pet, the hallmarks of a proper fit are pretty straightforward. Your harness should have flat straps that sit comfortably without bunching or twisting. The chest ring needs to be centered and your dogs shoulders should have complete freedom of movement.
Dogistry recommends watching for subtle signs that something might need adjustment. Is your dog pawing at the harness? Constantly trying to rub against something? These could be signals that the fit isnt quite right. Pay attention to how the harness moves during walking some slight movement is normal but excessive shifting means you need to readjust.
Quick Tip: Dogs change shape as they grow or gain muscle. What fits perfectly today might need tweaking in a few months.
Check for any red marks or areas of potential chafing especially around the armpits and chest. If you see any signs of discomfort dont hesitate to loosen or readjust a strap. Your dogs comfort is the top priority.
Ready to confidently walk your dog? You now have all the skills to make your no pull harness work like a charm.
Here’s a summary of each harness fitting step:
| Step | Main Task | Key Tips |
|---|---|---|
| Select Size | Measure chest girth | Use soft tape Two-finger space Size up if between sizes |
| Adjust Straps | Ensure snug, not tight | Two-finger test Check for twisting Allow full movement |
| Position Harness | Place and align straps | Loosen straps first Chest strap above shoulders Use treats for ease |
| Attach Leash | Choose attachment point | Front ring for no-pull Back ring for casual walks |
| Test on Walk | Check comfort in motion | Watch for chafing Start with short walks Adjust as needed |
| Final Check | Inspect fit and comfort | Flat straps Freedom of movement No red marks |
Ready for Stress-Free Walks with Your Dog? Discover Easy Solutions at Wuffinity
Struggling with harness sizing, uncomfortable fits, or your dog’s constant pulling? If you’ve followed the steps in our guide and still face issues with harness adjustments, chafing, or ineffective no pull training, you are not alone. Finding truly effective gear that keeps your dog safe and happy can be overwhelming. You want a solution that matches your dog’s needs and supports positive training while ensuring every walk is smooth and enjoyable.
Take control of your walks now with premium dog harnesses and accessories designed for real results. Explore the curated collection at Wuffinity’s store for reliable, comfortable, and stylish options that address pulling, fit, and safety. Shop with confidence and feel the difference on your next outing. Visit Wuffinity.store today to experience hassle-free shopping plus international shipping, a friendly support team, and special offers on the latest arrivals.
Frequently Asked Questions
How do I measure my dog for a no pull harness?
To measure your dog for a no pull harness, use a soft measuring tape to find their chest girth, which is located at the widest part just behind their front legs. Ensure the tape is snug but allows for about two fingers of space, then consult the manufacturer’s sizing chart to choose the correct size.
What is the two-finger test for adjusting a no pull harness?
The two-finger test involves sliding two fingers under each strap of the harness once it’s on your dog. This ensures the harness is snug enough to stay in place but not so tight that it restricts your dog’s movement.
Where should I attach the leash on a no pull harness?
For no pull training, attach the leash to the front ring of the harness to discourage pulling by redirecting your dog’s momentum. If your dog walks calmly without pulling, you can switch to the back ring for a more traditional walking experience.
How can I check if the harness fits properly during walks?
During a walk, check that the harness does not shift excessively and that your dog can move freely without signs of discomfort. Look for any red marks or chafing, especially around the armpits and neck, and make necessary adjustments immediately if you notice any issues.
What should I do if my dog seems uncomfortable in the harness?
If your dog appears uncomfortable, take them for a short walk to observe their behavior and readjust any straps that may be too tight or loose. Making small adjustments, such as loosening a strap by a finger’s width, can significantly improve your dog’s comfort while wearing the harness.
How long should I walk my dog initially with the no pull harness?
Start with short walks of 10 to 15 minutes in a low-distraction environment to allow your dog to adjust to the no pull harness. Gradually increase the length of your walks as your dog becomes more comfortable and familiar with the harness.
Recommended
- Military-Grade No Pull Dog Harness
- Understanding Types of No-Pull Harnesses for Dogs – Wuffinity Dog Store
- What is the Best Dog Harness to Stop Pulling? Understanding Options – Wuffinity Dog Store
- Understanding Different Dog Harness Types Explained – Wuffinity Dog Store
- Understanding What Leash is Best for a Dog that Pulls – Wuffinity Dog Store
0 commenti